On an Oʻahu shark dive, you’ll get your best shots when you plan like a traveler and move like a diver, calm, close, and intentional. You choose cage or freedive based on your comfort and the angles you want, then you check the operator’s ethics so your photos don’t come with a bad story. Go wide, keep strobes low to dodge backscatter, watch the swell and the sharks’ body language, and you’ll notice the ocean starts cooperating, but only if you do first.
Key Takeaways
- Choose freediving for natural, eye-level passes, or a cage for stable head-on frames and easier shooting in current.
- Prefer non-baited, no-chum operators; confirm feeding policies, trained crew, emergency plans, and small groups (6–12) for safer, cleaner shots.
- Book early-morning departures for smoother seas and clearer visibility; target slack tide and swell under 2–3 feet to reduce backscatter.
- Position downcurrent with a clear sightline to the bait bucket and divers, holding a steady depth band and avoiding drifting through others’ frames.
- Stay neutrally buoyant with quiet fin kicks, keep hands tight to your housing, and shoot wide with the sun slightly behind sharks to control glare.
Choose Your Oʻahu Shark Dive Format (Cage vs. Freedive)
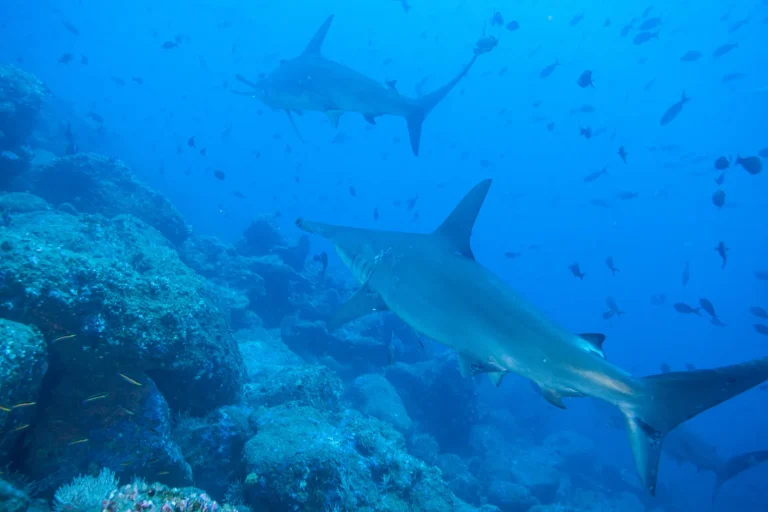
Pick your dive format first, because it shapes every photo you’ll bring home, from tight, toothy portraits to wide shots that show a shark cruising through blue water. Before you book, weigh the pros and cons of cage versus freedive so your comfort level and goals match the experience. If you’re new, or you’re targeting pelagics like great whites, a cage shark dive gives you a steady platform, you can brace your housing, wait for the turn, and nail head on or open mouth frames while staying protected. When currents rip or you want long shooting time, the cage keeps things practical.
In Oʻahu, freediving with skilled local guides suits tiger and Galápagos encounters, you glide at eye level, watch behavior unfold, and capture cleaner, more natural angles. Pack lighter, think mirrorless or GoPro, shoot bursts or video, and practice buoyancy for calm, quiet passes.
Baited vs. Non-Baited: What Your Operator Does
Because the way your operator brings sharks in, or doesn’t, sets the whole tone of the water, you’ll want to ask one question before you even charge your batteries: is this dive baited or strictly non-baited?
Before charging your batteries, ask: is this shark dive baited, or strictly non-baited? It changes everything underwater.
On baited dives, loose chum or a bait crate can stack sharks close, and you may see quick turns and bold passes, great for wide-angle frames and the occasional mouth-open moment. You’ll likely stay off to the side, follow safety rules, and accept limited finning.
On non-baited dives, the ocean feels quieter; sharks cruise in on boat noise, fish scraps, and seasons, with tiger action peaking June to November. You can move more freely, freedive, and match their slower rhythm.
Ethical operators also avoid practices like hand-feeding sharks and prioritize minimal-conditioning interactions.
Confirm chumming, hand-feeding, and legal compliance before booking.
Pick Ethical North Shore Oʻahu Shark Operators
If you want shark photos that feel wild, calm, and earned, start by choosing an operator that treats the North Shore like a living place, not a theme park. For Shark Diving on the North Shore of Oahu, pick crews that keep it simple, safe, and photo-friendly.
- Prefer non-baited, no-chum trips, Haleiwa Shark Tours is a good benchmark.
- Confirm trained crew, clear emergency steps, and groups capped around 6–12.
- Ask how they place shooters, free-diving versus cage, and camera mount tips.
- Look for straight talk on likely species, not vague promises.
- Check recent reports and images for water space, diver manners, and approach distance.
If you’re going without a rental car, plan your timing around getting there without a car so you’re not rushed at check-in. When an operator explains rules before you splash, you’ll relax, breathe slower, and your shutter timing suddenly improves a lot.
Best Season and Water Conditions for Oʻahu Sharks
While Oʻahu’s North Shore can deliver shark encounters in every month, your best odds for tiger sharks line up with summer into fall, roughly June through November, when big females cruise closer to shore to mate and give birth.
Because tiger sharks are among the main species visitors ask about, review key Tiger Sharks safety basics before planning your shoot.
Outside that window, you’ll often spot Galápagos and other reef sharks year-round, but your photos usually pop most from May to October, when the dry season brings lighter trade winds and clearer blue water.
Aim for calm, glassy days with swell under 2 to 3 feet, so you can hold steady, shoot wide, and keep sand and plankton from turning into backscatter.
After heavy rain or a northerly swell, expect milkier water and more bits, which can look gritty, or cinematic if you light carefully.

Best Time of Day for Light and Visibility in Oʻahu
Start early, because on Oʻahu’s north shore the morning window, roughly 0700–1030, often brings the lightest winds, the smoothest surface, and the longest, clearest view underwater, especially if you time it near slack tide so currents don’t kick up a milky haze. In the North Shore Weather Guide for Shark Diving Days, keep an eye on trade winds because they often strengthen later in the day and can roughen the surface and reduce visibility.
By late morning into noon, the sun sits high and punches through like a spotlight, which can give you crisp sunbursts and bold silhouettes, but it also highlights every floating speck, so keep your angle tight and your strobes modest to cut glare and backscatter.
As afternoon rolls in, the sun drops lower and the water can look warmer but less clean, with side-light, longer shadows, and a bit more surface texture, so you’ll want to watch for haze, pick cleaner water lines, and shoot with the sun off your shoulder when you can.
Morning Sun And Calm
Because Oʻahu’s ocean often behaves best before breakfast, the early-morning window from about 0600 to 0900 gives you calmer seas, less wind chop, and noticeably cleaner visibility for shark shots.
You’ll feel the difference right away the moment you roll in, with smoother surface light and steadier framing on calm mornings.
This is why the best time of day for shark diving on Oʻahu is often the morning rather than the afternoon.
With the sun low in the east, you can tuck it behind a shark for rim light or a bold silhouette, while keeping colors warm and natural.
- Book boats that leave harbor at first light.
- Check tide and swell, favor neap tides and low swell.
- Back up slightly, go wide, and include the reef and divers.
- Use natural light effectively within 10 to 20 feet.
- Hold position calmly, fewer bubbles means cleaner compositions.
Midday Glare And Backscatter
Midday on Oʻahu, roughly 11:00 to 14:00, puts a bright spotlight on the water, turning the blue deeper and giving you strong natural light for wide-angle shark photos, even if the surface can flash like a mirror when you tilt up toward the sky. To keep sparkle from stealing your frame, put the sun behind you and compose lower, using more water column to avoid blown highlights. Visibility can still swing with water clarity factors like swell and plankton, so be ready to adjust your distance and exposure on the fly. If backscatter pops, set strobes wide and angled outward, or switch them off for distant sharks and use ambient blue. Shoot just before or after peak midday to ease glare but keep strong downwelling light. You’ll get bold color, fewer surprises.
| Problem | Quick fix |
|---|---|
| Mirror-like surface | Compose lower, skip the sky |
| Speckled backscatter | Strobes wide, or switch off |
Afternoon Angles And Haze
As the sun slides west and drops lower over Oʻahu, the ocean light shifts from bright and clinical to warm and directional, and your shark photos can suddenly look richer and more three-dimensional. For underwater photography, aim for 3 to 5 PM for warm side light, but expect haze as winds rise on the North Shore. Before committing to that afternoon window, check marine forecasts for wind speed, swell direction, and wave period so you can anticipate surface chop and changing visibility. If it’s after 4, shafts can light up specks, so drop strobe power, widen your angle, or lean into natural-light silhouettes.
For crisp wide-angle scenes, go late morning when visibility peaks, then return later for moodier sharks and richer color.
- Keep the sun slightly behind sharks
- Watch surface glare, then tilt down
- Use low-power strobes, wide coverage
- Try silhouettes for hazy afternoons
- Plan clearest reef shots before lunch
Plan Your Spot in the Water (and With the Group)
If you want shark photos that feel calm, close, and intentional, plan your spot in the water before you even slip your fins on. Ask the operator where photography stations are, which side you’ll get, and whether there’s a priority order, because fixed spots stop you from blocking others and help sharks cruise without drama.
Once in, at first hold your position relative to the current and bait flow, often facing down current or near the bait bucket so approaches look predictable. Keep a clear sightline to the bucket and other divers, stay within your 1–2 meter depth band, and don’t drift through someone’s frame. Before you even gear up, pay attention during check-in to how your operator assigns groups and boat positions, since that often carries through to where you’re placed in the water.
Tell the divemaster your shot goals, then scan for bubbles and buddies, and tweak your angle with their OK.
Pack Simple, Reliable Shark Photo Gear for Oʻahu
Often, the best shark shots on Oʻahu come from the simplest kit you trust, because the water can tug at you, the action happens fast, and you don’t want to wrestle a fussy camera while everyone else holds position. Pack a rugged GoPro Hero 11 or a compact camera in a housing you’ve tested, and keep controls simple. Before you drop in, confirm your GoPro settings are dialed for Oʻahu’s shark-diving conditions so you’re not troubleshooting underwater.
- Choose wide-angle or fisheye view so you can swim closer and lose less haze.
- Use a flat or natural profile, dial down sharpness, and save room to edit later.
- Mount two strobes wide and low for fill on near passes.
- Switch strobes off when sharks drift far or when particles sparkle with backscatter.
- Practice burst and 30 fps video at home, so you’ll snag frames mid-swoop.
GoPro vs. Camera Rig: What Works on Oʻahu Trips
On Oʻahu shark trips, you’ll feel the current tugging at your fins, and that’s where a GoPro Hero 11 Black shines, it’s small, tough in its housing, and 5.3K footage makes it easy to pull crisp stills later without fuss.
Set Flat or Natural color, dial down sharpness, and use RAW when you can or high-bitrate 5.3K video, then run burst or continuous recording so you catch quick turns and close passes without chasing a single perfect frame.
Between a GoPro and a sealed phone housing, GoPro vs Phone Case usually comes down to how secure you want your setup to feel when the water gets sporty.
A full camera rig can reward you with more control and cleaner lighting when the water settles, but in pushy conditions you’ll usually do better staying streamlined, saving the ultra-wide housing and twin strobes for calmer days when you can get close and keep backscatter in check.
GoPro In Currents
Lean into the current and you’ll quickly see why a GoPro beats a full camera rig on most Oʻahu shark dives, especially when the nearshore water starts sliding past you like a moving walkway.
In Hawaii’s cross-currents, keep it small and floaty, so you can kick, breathe, and reframe without wrestling drag. Shoot 5.3K or 4K at 60 to 120fps, or use 30fps Burst, then pull crisp stills from the flow when a shark banks and sunlight flickers. Set color to Flat or Natural, dial sharpness down, and let post work handle the sudden shift from gin-clear blue to sandy snow. In low-visibility water, prioritize close focus to reduce backscatter and keep the shark’s eye tack-sharp.
- Short pole for framing or wrist leash
- Horizon lock, stabilization on
- Floaty housing, low drag
- Natural-light video, no strobes
- White balance, grade later
Camera Rig Control Tradeoffs
Because Oʻahu shark dives feel more like a moving snorkel mission than a staged photo shoot, you’ll get more keepers by choosing the camera you can actually control when the surge nudges your fins and a shark slips by in two calm seconds.
GoPros shine here: they’re small, already waterproof, and you can roll continuous 5.3K video or hit Burst Mode for 30 fps, then pull crisp stills later without fumbling with buttons.
Larger camera rigs with a wide lens and twin strobes can deliver richer color up close, but they drag like a mini sea anchor and tempt curious teeth.
On the boat, use a secure camera lanyard and keep your setup stowed until you’re ready to enter so it doesn’t get knocked, splashed, or dropped in the shuffle.
If you bring one, lock in a flat profile, lower sharpness, and practice so you can change settings in under three seconds easy.
Wide-Angle Settings: Lens Choice or GoPro FOV
Go wide and get close, it’s the simplest way to make Oahu shark shots look crisp instead of murky. A wide-angle view lets you fill the frame while cutting the blue water between you and the shark, so contrast pops and details like scars and eye shine read clearly. While a zoom can be handy for timid sharks, wide-angle usually wins underwater because it minimizes the water column and keeps images sharper and more vibrant.
Go wide and get close, less blue water means sharper Oahu shark photos with bold contrast, scars, and eye shine.
- DSLR or mirrorless: pack a fisheye or ultra-wide, think 10–16mm APS-C or 12–24mm full-frame.
- Want straighter reef lines for a portfolio? Choose rectilinear, or crop later.
- GoPro: set FOV to Wide or SuperView, and run 5.3K/60 for grab-worthy stills.
- If sharks cruise fast, use burst 30/1s or pull frames from video.
- Keep your port within 1 to 2 meters when it’s safe, wide lenses love proximity.
Stay calm, fin slowly, and let sharks drift past.
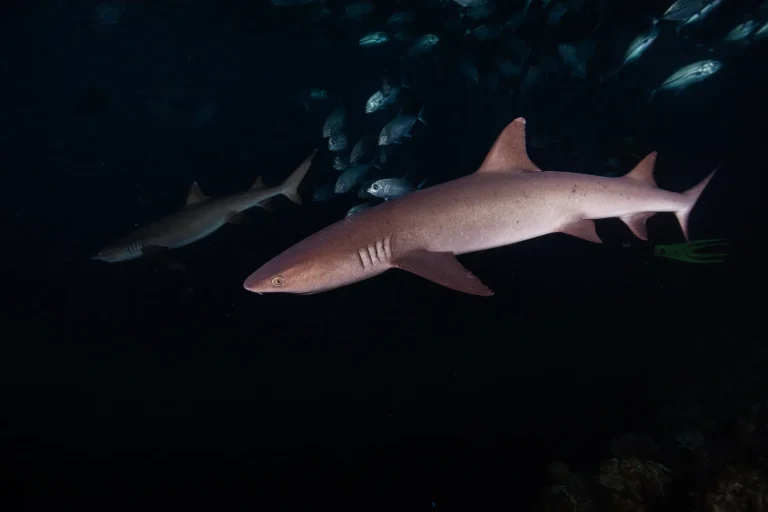
When to Use Strobes (and When to Turn Them Off)
When a shark slides in close and the water turns that familiar Oahu blue-green, strobes can be the difference between a flat, hazy snapshot and a frame with real bite. Use your strobe when the animal’s inside 3 to 4 meters, because you’ll bring back color, crisp edges, and that silver sheen along the flank. Before you even drop in, use a reliable mask defogging routine so you’re not fighting a hazy view when the action heats up.
Set your arms wide and push the heads out from the port, then angle them slightly outward so you light the shark, not the snowstorm, and cut backscatter. If the water’s milky with particulates, drop power, add diffusers, or run a single off-camera strobe. Turn them off for far passes, silhouettes, or sunbursts, and for close mouths or pale bellies, dial down to keep texture, not blown white highlights.
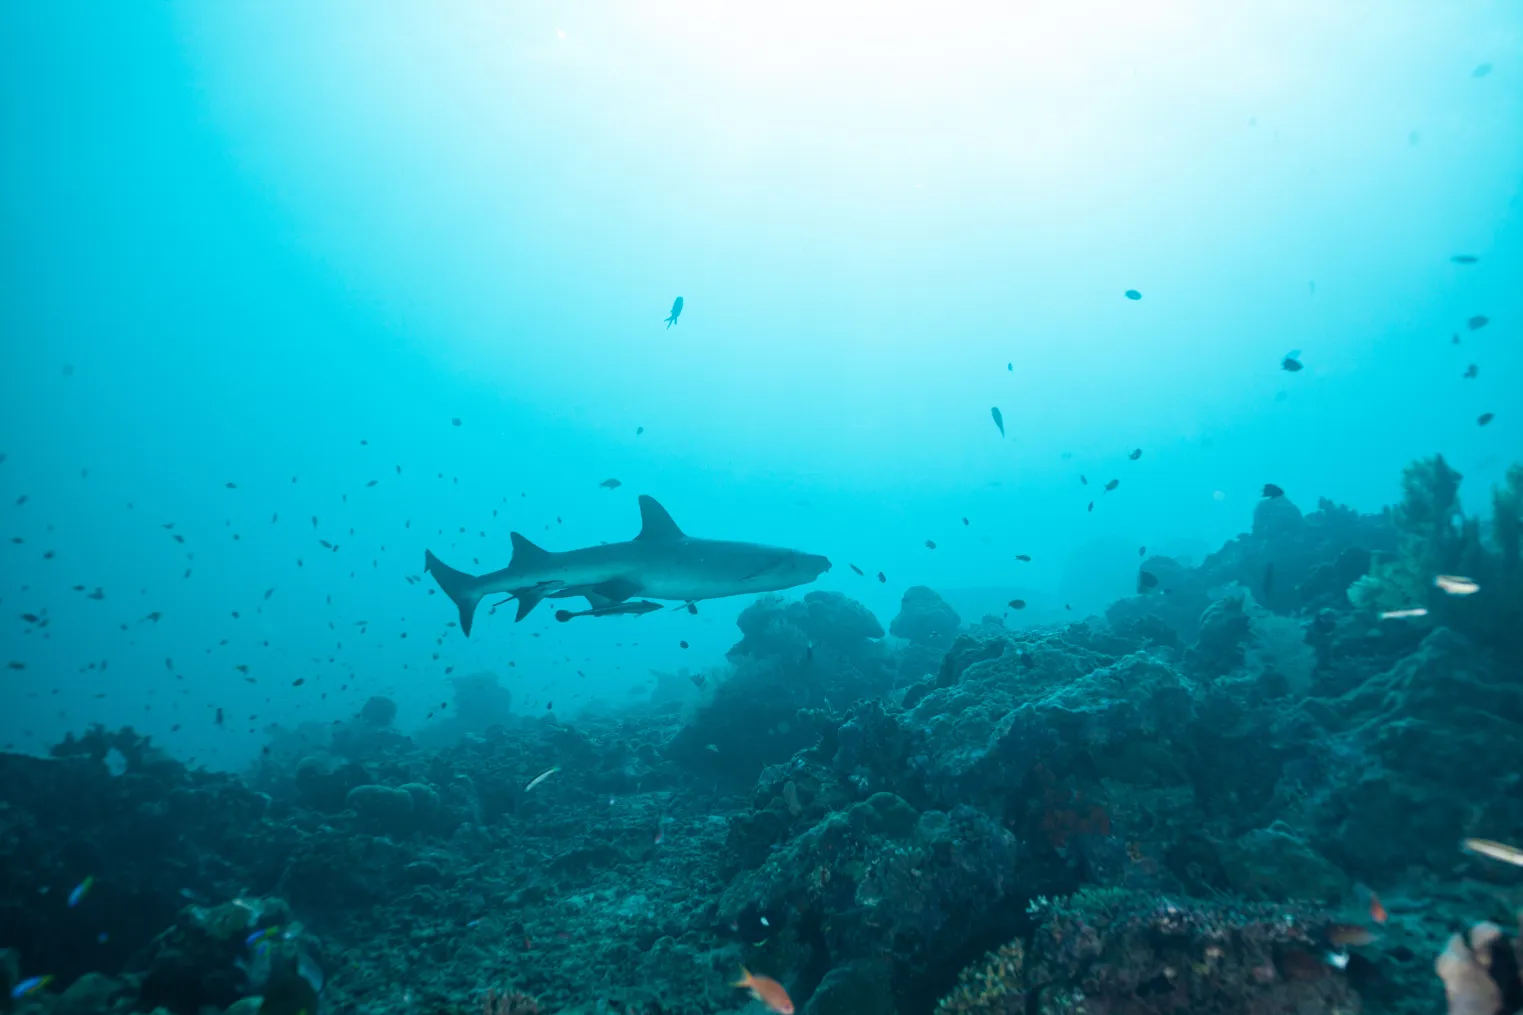
Natural-Light Exposure Tips for Blue-Water Sharks
If you leave the strobes off and let Oʻahu’s blue water do the work, you’ll get cleaner frames that feel airy and true, as long as you treat exposure like a moving target.
In clear blue water, set 1/250 to 1/500s, ride ISO 200 to 800, and keep depth under about 15 m so natural light stays punchy.
Before you drop in, double-check your mask defog and that your camera housing seal is clean and secure so you’re not fighting fog or leaks mid-dive.
- Go wide, 10 to 16mm crop or 14 to 24mm full frame, and close in to 1 to 3 m
- Aim slightly up, using the sun for a rim or silhouette
- Meter on the shark, let the surface blow out, and protect its texture
- Shoot 09:00 to 14:00 for the strongest downwelling glow
- Warm white balance a touch, about +200 to +800K, and fine-tune in RAW
Read Shark Body Language Before You Drop In
Before you even drop in, scan for calm versus agitated signals, a relaxed head and level pectoral fins read like an easy cruise, while a raised head and stiff, downward fins suggest you should slow your movements and give more space.
Next, watch the approach angle, a glancing pass is usually casual, but a straight, head-on track with steady eye-facing means you should slide sideways and keep your camera close to your body.
Finally, note feeding cues in the water’s tempo, quick tail sweeps, tighter group spacing, and frequent gill flares are like a rush-hour lane change, so hold position, follow the operator’s cues, and let the action come to you.
Sharks may also make wider circles as part of sensory checking to assess scent and vibration before committing to a closer pass.
Spot Calm Vs Agitated
Although the cage or water looks inviting from the deck, you’ll get better photos and a smoother drop-in by taking 20 seconds to read the sharks like you’d read a lineup of surfers.
Watch tails: slow, even undulations and level swimming signal calm; quick, jerky beats, an arched body, or rapid circling mean you wait.
Scan fins, head, and the surface scene, because splashing, shouting, or a sudden boat bump can spike energy right before you’re diving with sharks, and you want good buoyancy for steady shots. Once you’re in, follow move calmly etiquette, float neutrally and avoid sudden kicks or splashes, to keep the encounter settled.
- Pectoral fins level and slightly out: relaxed.
- Pecs stiffly down or flipped up: stressed.
- Head-down, gills lowered, snout tilted: delay.
- Even spacing, slow cruising: settled.
- Clustering, milling, frequent breaches: excited, stay aboard
Read Approach And Angle
Once you’ve spotted a few sharks sliding past the cage, take a full minute or two to study how they’re approaching, because their angle tells you whether you’re about to photograph calm curiosity or a keyed-up feed run.
From the surface, watch shark posture and the approach and angle against the current; sharks usually face into the flow, so slip in downstream, then drift to meet them from the side or ahead for eye contact.
If you see gills pumping, mouths parting, or quick head rolls with an arched back, hold depth and give space until the glide smooths out.
Notice spacing: if one shark cuts in and the group tightens, stay put.
Slow tail beats help framing, rapid flicks mean brace buoyancy now.
Before you drop, confirm the crew is following operator safety protocols like clear briefings, controlled entries, and no baiting that could amp up shark competition.
Note Feeding Cues
Hold off for a beat and read the scene like you’d scan a busy crosswalk, because feeding cues change the whole vibe of your drop. Before you slip in, keep watching the shark’s head and pectoral fin position,look for rapid tail swishing. If you see an elevated head, stiff lowered fins, or quick bursts of speed, you’re looking at feeding focus, so wait and let the guides set the timing. Remember that chumming vs feeding aren’t the same thing, chumming lays out an attractant, while feeding is the active bite-and-consume behavior that spikes competition.
Slow, nose-first passes with a closed mouth feel more like curiosity than conflict, giving you a calmer window to frame shots.
- Rapid tail swishes or zigzags near bait
- Tight clusters of sharks with little spacing
- Repeated circles around the boat or line
- Surface splashes, diving birds, or fish panic
- Relaxed glide, steady pace, wider turns
Stay Calm Underwater: Posture, Breathing, Buoyancy
Often, the best shark photos on Oahu start with the simplest skill: staying calm in the water, so your body looks predictable and your camera stays steady.
Underwater, slow your breathing to about 6 to 8 breaths a minute, you’ll hear fewer bubbles and you won’t twitch on the exhale.
For Diving, settle into a relaxed, horizontal line, hips slightly down, fins level, like you’re gliding over a sidewalk curb, not standing up to greet anyone.
Use small, quiet fin kicks, keep your arms still, and stop sculling so you don’t broadcast jittery vibrations.
Trim your weights until you can hover neutral at depth within about a foot, then keep hands close to your housing, eyes on sharks and your buddy at all times.
Compose Around Bubbles, Divers, and the Bait Bucket
Slip into position with intention, because on Oʻahu shark dives your best frames come from composing around the busy stuff, not fighting it.
Slip into position with intention, on Oʻahu shark dives, your best frames come from composing around the chaos, not battling it.
Set up slightly lower and off to the side of the bait bucket, so it reads as scale, not chaos, and you keep hands and bubbles from stealing center stage. Watch other divers’ bubble streams, then tilt your frame so they exit cleanly or slice diagonally like a trail of silver soda.
- Hold your assigned spot, then slide into a clean lane.
- Leave negative space ahead of a cruising shark.
- Park a diver or the bait bucket in the background for context.
- Let bubbles imply motion, never mask a face.
- Angle strobes, or switch to available light when water looks snowy.
Edit Shark Photos: Color, Backscatter, and Restraint
Start your edit by fixing that underwater blue cast so the shark looks like it did in real life, warming your white balance or tweaking temperature and tint until subtle yellows and reds return without turning the water into a cartoon.
Next, zoom to 100% and clean up backscatter with a gentle healing or clone pass, picking off the big bright specks nearest the shark first, like brushing sand off a black wetsuit.
Keep your hand light and your story honest, because a clean frame still needs to feel like Oahu’s open water, not a studio set.
Fix Blue Cast Naturally
Under Oahu’s rolling swell, your shark shots can look like they’ve been dipped in blue sports drink, but you can pull them back to life with a few calm, natural edits. Start with files that can bend: shoot RAW or a Flat profile, and keep in-camera sharpness low so midtones survive. Then warm things up like sunrise on Waikiki.
- Set white balance using a gray tag, sand, or slate from the dive.
- Nudge temperature +400 to +1200K, and add magenta tint if green creeps in.
- Use a strobe or video light only within 1 to 1.5 meters, or the ocean steals the reds.
- Lift midtones gently, then tame contrast so skin stays smooth.
- If color won’t return, go black-and-white and boost clarity for silhouettes.
Remove Backscatter With Restraint
Once you’ve warmed the color back from that blue-sports-drink wash, the next thing that jumps out is backscatter, those tiny white flecks and bubbles that look like someone shook a snow globe in front of your lens. In shark photography, zoom in and heal only the loudest dots near the eye, snout, or edge, letting grain stay honest. If your strobes didn’t reach a distant shark, set white balance first, then spot-fix so tones match.
| Scene | Fix | Go easy |
|---|---|---|
| Isolated specks by shark | Heal brush | Keep texture |
| Soft haze, sunbeams, heavy patterns | Dodge, reduce clarity, or try black and white | Let it feel atmospheric |
Save an untouched copy, and disclose retouching for contests or reportage.
Frequently Asked Questions
Do I Need Special Permits to Photograph Sharks in HawaiʻI Waters?
You usually don’t need special permits to photograph sharks in Hawaiʻi waters, but you may need federal permits for work, research, or protected areas. You must follow regulations and cultural considerations, and don’t harass wildlife.
What Insurance Should My Camera Gear Have for Boat-Based Shark Dives?
You’ll want equipment insurance that covers saltwater, flooding, theft, and transit on boats, plus liability coverage for accidental damage or injury. Like Odysseus lashing gear to the mast, you’ll stay protected when seas shift suddenly.
How Do I Prevent Seasickness Without Affecting My Breath-Hold Performance?
You’ll curb seasickness by timing meds early and choosing non-sedating options, then stick to a hydration strategy: small sips, electrolytes, no alcohol. Use visual fixation techniques on the horizon, breathe slowly, stay warm before dives.
Should I Tip the Crew, and What’s an Appropriate Amount on OʻAhu?
Yes, you should tip the crew on Oʻahu; you’ll show appreciation and follow local cash etiquette. Typical gratuity rates run 15–20% of trip cost, or $20–$40 per person for longer charters, based on their service.
How Can I Back up and Store Photos Safely Between Multiple Ocean Days?
Back up each day to two places: a laptop and a portable SSD, and keep redundant backups on cloud when you’ve got Wi‑Fi. Store cards and drives in waterproof cases, and rotate media daily too.
Conclusion
Plan your Oʻahu shark shoot like a local, pick the right format, vet ethics, and chase those calm North Shore mornings when the water turns gin clear. Coincidentally, the day you leave your big rig behind is often the day the current behaves, and your GoPro gets the cleanest pass. Stay neutral, breathe slow, watch fins and posture, then frame around bubbles and buckets. Back on land, edit gently, let the blues breathe.