Like a modern-day Cousteau with a carry-on, you’ll want your GoPro dialed in before you back-roll into Oahu’s deep blue. Shoot 4K or 5.3K at 60 fps for crisp passes and easy slow-mo, keep HyperSmooth on, use Wide or Linear plus Horizon Lock so the boat chop doesn’t ruin the frame, then lock white balance around 5500 to 6500K with Flat color, Low sharpness, and ISO max 400 to avoid that noisy aqua haze. But here’s the catch, your best setting changes with depth, distance, and sun angle…
Key Takeaways
- Record 5.3K60 for smooth motion, strong stabilization, and frame grabs; drop to 4K60 if storage or battery is limited.
- Enable HyperSmooth (DIVE if available); use Boost only in strong current, and back up slightly to offset the stabilization crop.
- Use Wide FOV for close passes and moving sharks; switch to Linear + Horizon Lock when you want straighter lines for reels and stills.
- Turn on ProTune and shoot Flat color with Low sharpness; lock white balance at 5500K near-surface or ~6500K deeper to avoid color shifts.
- Cap ISO Max at 400 and keep exposure conservative to reduce grain; use a red filter within 1–6 ft, lights beyond 6 ft or deeper.
Best GoPro Settings for Oahu Shark Dives (Copy These)
While the sharks glide in and out of that deep Oahu blue and the boat rocks gently above you, you’ll get the cleanest, most usable footage by locking in a simple “copy these” setup before you even seal the housing: record in 5.3K at 60fps (drop to 4K if your card or battery can’t keep up) with HyperSmooth on, enable ProTune with Color set to Flat, Sharpness Low or Medium, and White Balance fixed at 5500K so your colors don’t drift mid-clip, then stick with a Wide or Linear view depending on how much edge stretch you’re willing to fix later.
If you’re deciding between bringing a GoPro or a phone in a case, the GoPro typically delivers more reliable shark dive footage in Oahu conditions.
On your GoPro Hero, shoot continuous video or Burst, or bump to 120fps for slow-mo when a shark slips past your underwater GoPro.
Prep Battery, SD Card, and Housing Seal (Before You Splash)
Locking in the right GoPro settings is only half the win, because the cleanest shark pass means nothing if your camera dies, your card fills up, or a single grain of sand breaks the seal.
> Nailing GoPro settings is only half the win, dead batteries, full cards, or a sandy seal will ruin the best shark pass.
Before you splash, run this preflight:
- Charge and label three batteries, swap to a full spare before each dive, and keep one charging with a power bank.
- Use a UHS-I U3 microSD (64GB works), format it in-camera, and download clips daily.
- Open the housing, inspect and lightly lubricate the O-ring, clear hair or sand, seat it, and remove the lens cover if needed; close it and do a shallow test.
Keep wallets, keys, and other small items secured using your tour’s valuables storage option so nothing important ends up loose on the boat.
Set LCD Auto Off to Never, check remaining space, then rinse and dry seals once more.
Choose 4K/5.3K for Oahu Shark Video
Two settings do most of the heavy lifting for shark dives off Oahu: 5.3K when you want every 3K-crisp scale and fin edge you can later pull into a still, and 4K60 when you want buttery motion and clean slow‑mo as a shark glides past in that clear, blue water. In low-visibility waters, prioritize getting closer (safely) and lighting the subject to preserve edge detail and avoid the mushy softness that comes from shooting through too much water. On a GoPro Hero11/12/13, set 5.3K (27MP) at 24–30 to keep detail high without turning your SD card into a suitcase of files. Stick with 16:9 for a natural widescreen look and full HyperSmooth, switch to 4:3 only when you know you’ll crop for extra headroom above the shark. Turn on ProTune, use Flat or Natural, keep Sharpness low or medium, and lock white balance around 5500K, or WBLK/WBDV, so blues don’t wander mid‑clip.
30 Vs 60 FPS for Sharks (Real-Time Vs Slow-Mo)
After you’ve picked 5.3K or 4K, frame rate is the next call that shapes how Oahu’s sharks look on screen, whether they cruise past like a calm documentary scene or snap into silky slow‑mo when a fin flicks and the water flashes silver.
After 5.3K or 4K, frame rate defines Oahu’s sharks, gliding documentary‑smooth or flashing into silky slow‑mo with each fin flick.
1) Choose 60 fps for most dives, it keeps turns and tail beats smooth, and you can slow playback to 50% without turning detail to mush.
2) If your gear can take it, shoot 4K/60 so you can crop tighter on a Galapagos and pull stills from the clip.
3) Use 30 fps only when you want smaller files to share fast, and save 120 or 240 for quick bursts of sudden lunges, because storage disappears fast. Use burst photos, too.
If you’re debating whether to skip the boat’s camera service, remember that photo packages can be pricey, so dialing in your GoPro settings is often the best way to bring home keeper footage without paying extra.
Choose the Best FOV (Wide vs Linear + Horizon Lock)
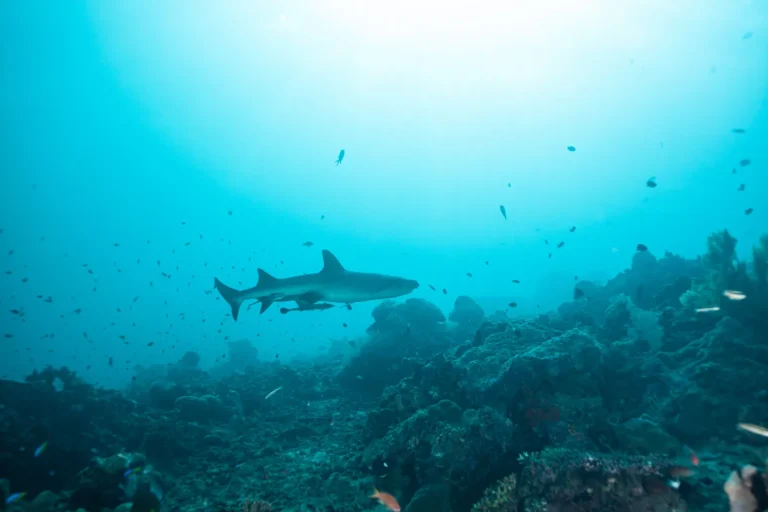
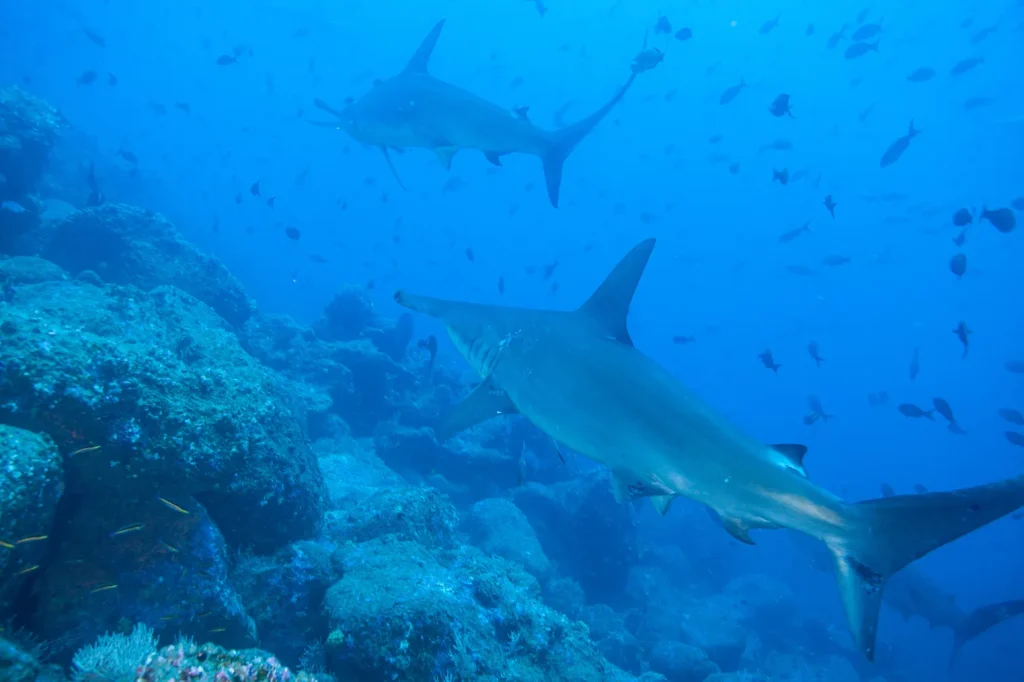
Most of the time, your field of view decides whether that tiger shark stays cleanly in-frame as it glides past in blue water, or slips off the edge the second the current nudges you sideways. For tight, exciting passes, pick Wide (or SuperView on older GoPros) so you capture more reef, more bubbles, and more shark without frantic re-aiming. It feels like sitting in the front row of the ocean.
Switch to Linear + Horizon Lock when you want straighter lines, cleaner stills, or an easy crop for vertical reels, but remember Linear trims the edges and narrows your safety margin. In strong current, stay Wide, shoot 5.3K or 4K with Flat color, then fix distortion and pull crisp frames later on the surface. Before you even hit the water, secure your GoPro with a camera tether on the shark dive boat so a sudden bump or splash doesn’t send it overboard.
HyperSmooth Underwater: On, Off, and Why
Keep HyperSmooth on in strong currents and surface chop, it smooths out your fin kicks and the boat’s wake so your shark clips look calm and your 4K frame grabs stay sharp.
Just remember it adds a small crop, about a 5 to 15 percent “zoom,” so when a big shark slides close you’ll want to back up a touch or switch to a wider view, and if your GoPro has a water-optimized setting like DIVE mode, turn it on.
In Oahu shark dives, steady finning and slow, controlled movements are key to underwater shark photography that looks natural and keeps your footage smooth.
If you need the absolute widest frame for a once-in-a-lifetime pass or you notice rare mid-clip shifts, test HyperSmooth off for a run, then compare the steadiness and be ready with a fresh battery since stabilization works your camera harder.
HyperSmooth In Strong Currents
While Oahu’s currents nudge you like a moving sidewalk and the surface chop taps your housing like light rain, HyperSmooth can be the difference between watchable, glidey footage and a jittery clip you’ll never post. In strong currents, keep it On for Hero7–Hero11, since it cancels wave slap and your fin kicks, especially when you shoot 60 fps or higher. Pair that with 5.3K or 4K so your still grabs stay crisp later too. On Oahu shark dives, visibility ranges can shift with swell, wind, rain runoff, and plankton blooms, so stable footage matters even more when the water isn’t crystal.
- Choose 60 fps, then let stabilization smooth your drift.
- On Hero12/13 or Labs, pick the DIVE mode for refraction aware results.
- For long runs, lock WB and exposure, and watch battery and heat, because HyperSmooth works harder and may cause micro jerks if the flow gets wild.
When To Turn Off
HyperSmooth earns its spot in your Oahu shark kit when the current tugs at your fins and the surface chop drums your housing, but there are a few smart moments to switch it off.
If a tiger shark slides in close and you want the widest view, turn HyperSmooth OFF so the camera doesn’t crop your frame by that extra 5 to 10 percent. Do the same when you’re on a tray, gimbal, or scooter rig, because double stabilization can look floaty, like a drunk hula.
Shooting 120 or 240 fps for slow motion? Some models struggle, so disabling HyperSmooth can prevent dropped frames.
When your camera offers DIVE or underwater modes, try them first, they still steady footage while keeping your framing true.
For those close-pass moments, a wide-angle lens will usually beat a zoom for shark photos, because it keeps more of the scene while you stay safely and steadily in place.
Settings That Affect Stabilization
Because water bends light and your body floats a little differently with every fin kick, stabilization settings that feel perfect on land can look oddly “rubber band” underwater, so it pays to choose your HyperSmooth level with intention. In Oahu’s surge, keep HyperSmooth On for most shark drops, and jump to Boost only when the current shoves you around, since it crops your view and can hide wide context. Before you roll, use mask defogging so your stabilized footage doesn’t end up sharp-but-hazy from a fogged lens.
- Shoot 4K60 or 5.3K60 so stabilization has clean frames to work with and you can pull sharp stills later.
- Try DIVE mode or GoPro Labs water tweaks if your clips wobble near reef lines, refraction can confuse standard HyperSmooth.
- Lock white balance and exposure before you descend, shifting light plus stabilization makes mid-clip changes scream.
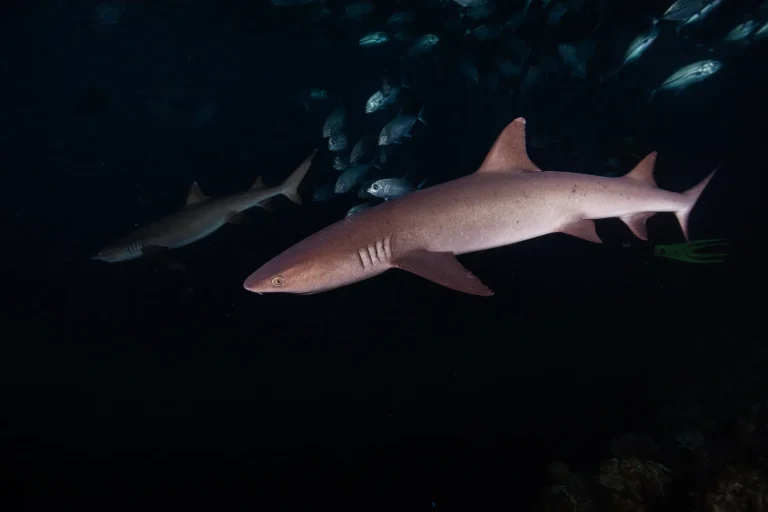
Lock White Balance for Oahu Blue Water (Kelvin Ranges)
Even if Oahu’s water looks like clean sapphire from the boat, your GoPro will try to “help” by shifting color as you roll, breathe, and angle toward the sun, so lock your white balance to keep the sharks’ greys and your skin tones steady from start to finish. Use the GoPro white balance lock, or set a fixed Kelvin, never Auto. Clip-test topside, then tweak in 250K steps. For steadier, more respectful footage, focus on underwater video composition that lets sharks move through your frame naturally instead of chasing them.
| Scene | Lock Kelvin | Cue |
|---|---|---|
| Surface snorkel | 5500K | Natural tones |
| 10m+ | 6000–7000K | Warms blues |
| With lights | 5000–5500K | Avoid magenta |
| Fine-tune | ±250K | Beige sand |
Near the surface, 5500K keeps shark bellies crisp. Drop past about 10 m, and bump warmth to 6500K so water stays Caribbean, not steel. If lights join the scene, pull Kelvin down a bit.
Flat vs Natural GoPro Color (Editing vs Ready-to-Post)
When should you pick Flat over Natural on a GoPro for shark dives in Oahu? Choose it when you want the lifelike blues and shark skin, and you’re willing to color grade later. Set Color to Flat to grab maximum dynamic range and skip that factory punch, then keep Sharpness at Medium or Low so edges don’t look crunchy and you can add polish in editing. Flat also shines in 5.3K or 4K if you plan frame grabs, because neutral tones make white balance and red recovery easier. A streamlined workflow makes it easier to turn Flat clips into polished Reels and YouTube edits without wasting time.
- Pick Flat for edited highlight reels and print worthy stills.
- Pick Natural (or Normal) for quick, shareable clips with pleasing contrast.
- If you won’t grade, lock white balance around 5500K near the surface.
Sharpness + ISO Limits to Avoid Noisy Blue Footage
Keep Sharpness on Low or Medium, so your shark silhouettes don’t get that crunchy halo against the bright blue and you can add polish later in editing.
Set Color to Flat and cap ISO Max at 400, ideally 100 to 200 in daylight, because once you push higher the water turns into a grainy, speckled wash that looks like sand stuck to the lens.
Lock ISO Min at 100 and use Auto ISO only when you must, then pair it with 60 fps so you stay crisp on quick fin turns without forcing the camera into noisy blue shadows mid-clip.
Before you jump in, double-check your essential gear is secure so you’re not fumbling with loose mounts or lanyards while trying to keep exposure steady.
Dial Down Sharpness
Back off the GoPro’s in-camera sharpness and you’ll trade those crunchy, haloed outlines against Oahu’s blue water for footage that looks smoother, more natural, and far easier to clean up later.
In Oahu’s open-ocean light, High Sharpness can sketch bright halos around sharks and bubbles. Flip on ProTune, set Color to Flat, and keep Sharpness at Low, or Medium if you want a touch more bite. Then use resolution, not sharpening, to hold detail, 5.3K on a Hero11 lets you crop or pull crisp stills without that crunchy look.
Before you even hit record, make sure you can clear your mask quickly so you’re not forced to crank sharpness to “save” shaky, distracted footage.
- Choose Low Sharpness for the cleanest water gradients.
- Try Medium only for murky days, and check fins against the blue.
- Review on a big screen, if it looks “over-salted,” dial it back.
Set Sensible ISO Limits
Low sharpness gives you cleaner edges, but ISO is the knob that decides whether Oahu’s deep blue water looks silky or turns into a speckled, grainy soup. Set ISO Min to 100 or 200, and cap it at ISO Max 400, so your 4K/60 or 5.3K clips stay crisp without that sandy fizz in the water column. Keep Sharpness on Low or Medium, then add bite later in editing, where you can control it like seasoning. Before you drop in, follow eat and drink right so seasickness doesn’t cut your dive short and force you to miss the cleanest light. To stop surprise exposure jumps mid-dive, fix white balance around 5500K near the surface and shoot ProTune Flat. Do a quick test clip, check your histogram or playback shadows, and if noise creeps in at depth, bring a small video light instead of pushing ISO past 800.
Prevent Blue-Noise Shadows
When you drop into Oahu’s deep blue and the light thins out, your GoPro can turn smooth shadows into a faint, blue haze if you let sharpness and ISO run wild. Tame it with three quick tweaks:
- Dial Sharpness from High to Medium or Low, or shoot Flat, so edge punch doesn’t magnify blue noise along reef lines and shark silhouettes.
- Cap ISO at 400, and aim for 100–200; if it’s dim, slow shutter a touch or add a video light within 4–6 feet instead of cranking gain.
- Shoot 4K or 2.7K at 60 fps, then hold 1/125–1/250s for crisp movement in current.
Lock white balance around 5500K near the surface, go higher with depth, and skip auto white balance shifts. A snug rash guard layers setup can also cut micro-bubbles and suit-flutter that show up as dancing specks in blue shadows.
Burst Photos for Fast Shark Passes (Settings + Timing)
Fire off Burst mode the moment a shark tilts into your lane, because those fast, smooth passes can vanish like a subway door closing and you’ll want a stack of frames to choose from later.
On newer GoPro models, pick the highest rate you’ve got, like 30 photos in 1 second, then keep Color on Flat or Natural and Sharpness on Low or Medium so scales don’t look crunchy.
Lock white balance, around 5500K near the surface, and turn on HyperSmooth to keep the sequence steady.
If you also booked one of the video packages, this burst-and-stills approach gives you plenty of frame options that complement what you usually receive from your shark dive footage later.
If your burst rate is limited, shoot 4K/60 or 2.7K/60 video and grab stills afterward.
Stay 1 to 3 feet away when it’s safe, aim wide slightly below the horizon, and start bursting just before the glide-by passes.
Red Filter vs Video Lights (Depth + Distance Guide)
Although Oahu’s water can look like pure sapphire from the surface, your GoPro starts losing warm reds fast, so you’ll get cleaner, more natural shark color if you pick your tool based on depth and distance.
Even in Oahu’s sapphire water, GoPro reds vanish fast, choose filters or lights by depth and distance for natural shark color.
- In 5–30 ft blue water, use a red filter when you’re 1–6 ft from the shark, it brings back red light with zero extra power.
- Beyond 6 ft, or deeper than 30 ft, use continuous video lights, they add warm tones filters can’t recover at range.
- Skip strong lights plus a heavy red filter, magenta happens, so remove the filter if you’re lighting.
Lock white balance near 5500K, shoot Flat, and in pushy current, record steady 4K or 5.3K at 60fps with a small light. Add blister-free fins so you can hold position comfortably without over-kicking and stirring up backscatter in your shot.
Frequently Asked Questions
How Close Can You Legally Get to Sharks While Filming in Oahu?
Oahu doesn’t set a fixed legal distance from sharks, so you must avoid wildlife disturbance and harassment. Give them several body lengths, and follow your operator’s 10–15-foot buffer. Check DLNR and charter rules always today.
Do Tour Boats Allow Selfie Sticks or Long Poles During Shark Dives?
Often, you can’t use long poles; some crews allow only short selfie sticks on the surface. Like Odysseus bound to his mast, you’ll follow boat rules: stow it, use approved safety gear, obey crew always.
What Time of Day Gives the Clearest Water and Best Shark Visibility?
You’ll get the clearest water in early morning, from first light to about 9:30, when winds stay calm and visibility peaks. Skip mid-afternoon; late afternoon can work if you hit slack, incoming tide and swell.
How Do You Prevent Fogging on the Gopro Lens Underwater?
You prevent fogging by drying the housing, letting it temperature-equalize, and sealing it with anti fog inserts. Nearly 70% of fogging comes from trapped moisture, so use lens wipes, check O-rings, and swap inserts often too.
What Camera Mount Works Best for Filming From Inside a Cage?
Use a front-mounted short pole/handle clamped to the cage bars; you’ll get the best cage perspective with handle stability and easy framing. Add a quick-release clamp, keep it 1–2 feet off bars, tether it.
Conclusion
You’ve dialed in the settings, now let the ocean do the work. Sharks have cruised these waters for about 400 million years, and your GoPro can finally keep up if you shoot 4K60, lock white balance, and keep ISO low so the blue stays clean. Stay wide, steady your mount, and start recording a few seconds early, because the best pass always happens when you’re blinking. Back on shore, you’ll thank yourself for extra frames.